 Help Center
 Go to Oodrive
Manage your synchronizations
You can manage your synchronizations individually or in bulk from your WebSynchro application at any time. Some actions can be performed from the file explorer.
You can synchronize a folder only if :
-
You are its owner,
-
You have permission to Edit, Organize or Collaborate on a received collaborative share.
Below is a list of actions you can perform to manage your synchronizations:
-
Add a new synchronization
-
Enable/disable a synchronization
-
Lock a synchronized file
-
Delete a synchronization
Add a new synchronization
You can add as many synchronizations to your WebSynchro application as you'd like, either from the application or the file explorer.
From the My Syncs screen of the WebSynchro application
-
Access your WebSynchro application.
-
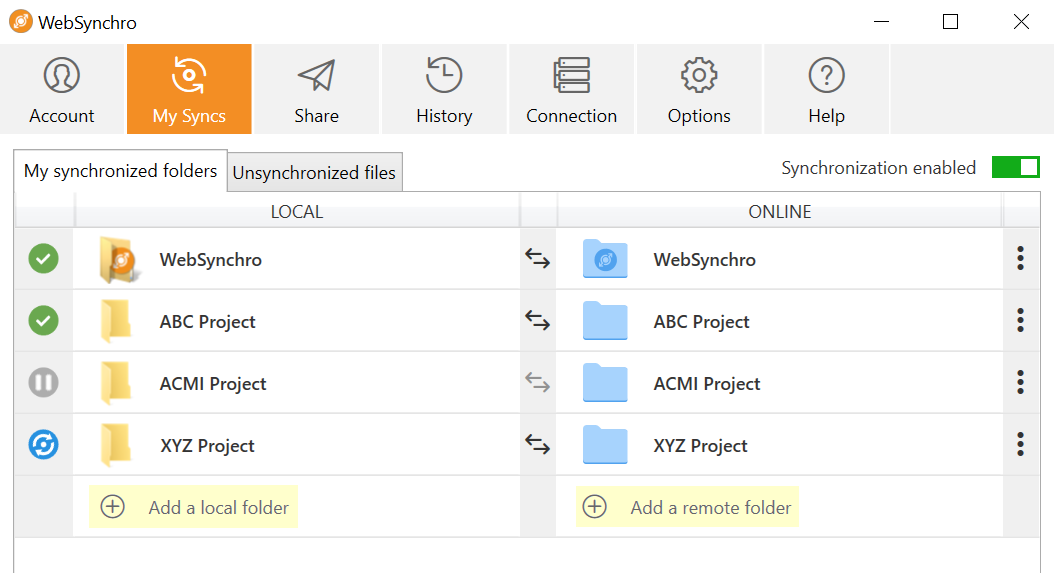
In the My Syncs tab, click the Add a local folder button to select a folder to synchronize with the online workspace.
-
Select a local folder to synchronize. To create a new one, click New folder….
The selected folder is added in the LOCAL column.
-
To choose the folder for the online workspace for local synchronization, click Add a remote folder.
-
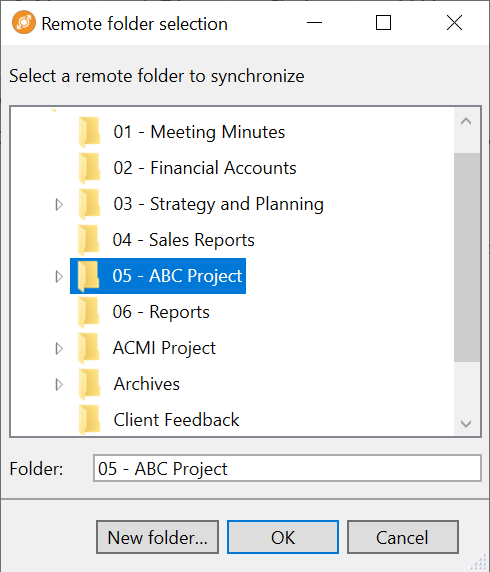
Select a remote folder to synchronize. To create a new one, select the parent folder, then click New folder….
The folder is then created online and added to the ONLINE column.
-
Click Apply to start the synchronization. The blue icon
 indicates synchronization is in progress.
 -
Once all the subfolders and files have been synchronized, the green icon
 indicates that the synchronization has been successful.
From the local file manager (quick sync)
-
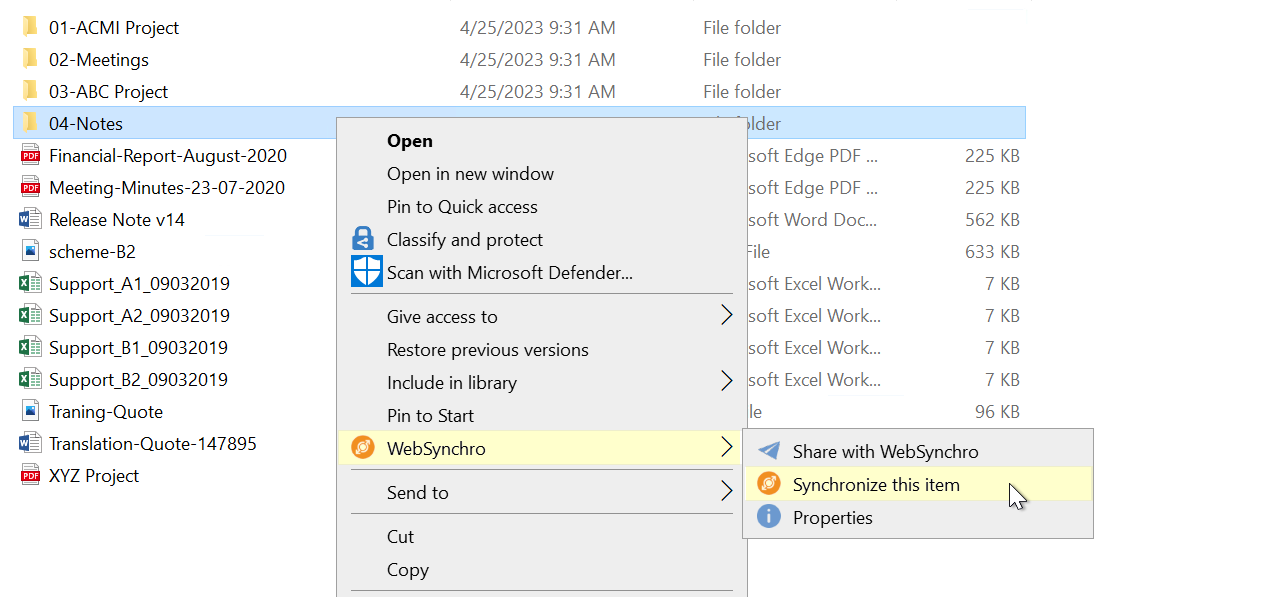
In your local file explorer, choose the local folder to synchronize.
-
Right-click the folder you want to synchronize, then select WebSynchro > Synchronize this item.
-
Choose the remote folder to synchronize with the local folder.
-
Click Apply to start the synchronization.
Quick access to synchronized folders
You can quickly access your local and online synced folders from the My Syncs tab.
To do so, double-click on the desired folder in the LOCAL or ONLINE column.
Please note
To access the remote folder, you must first authenticate yourself on the online workspace in your Internet browser. Otherwise, the login page will appear first.
Enable / Disable synchronizations
You can disable one or more synchronizations either from your WebSynchro application or your computer's file explorer at any time.
If you choose to disable one or more synchronizations, previously synchronized folders and files remain available as they were, both online and locally, but will no longer be synchronized.
From the My Syncs screen of the WebSynchro application
Disable /re-enable all synchronizations
-
Access your WebSynchro application.
-
In the My Syncs tab, click the general synchronization toggle switch in the upper-right corner of the screen to disable all synchronizations.
-
Click the toggle switch again to re-enable synchronizations.
All your synchronizations are disabled and the toggle switch shows Synchronization disabled.

Disable /re-enable one single synchronization
-
Access your WebSynchro application.
-
In the My Syncs tab, click the three dots to the right of the synchronization line you want disabled.
-
Click Disable the synchronization.
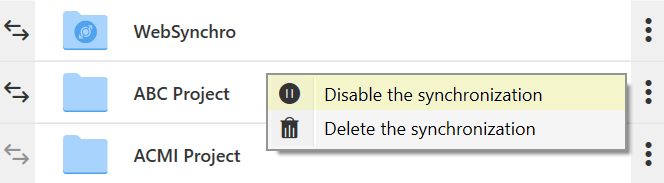
-
To re-enable synchronization, click the three dots again, then click Enable the synchronization.
This will suspend synchronization.
From the file explorer
You can disable/re-enable a synchronization from your local file explorer. For better flexibility and granularity of synchronization management, you also can operate on individual subfolders and files located within synchronized folders.
-
In the file explorer, select a synchronized folder/subfolder/file.
-
Right click the item, then select WebSynchro -> Unsynchronize

-
To re-enable synchronization, right-click the item and select WebSynchro -> Synchronize
This will suspend synchronization. A gray dot will appear on the unsynchronized item, showing that its synchronization is disabled.
Lock a synchronized file
In the file explorer, you can manually lock a file to prevent changes by your collaborators:
-
Locking the file locally will lock the file online when synchronizing, and vice versa.
-
A locked file can only be opened in read-only mode.
In addition, when a file of your online workspace is edited locally using Microsoft Office via EasyTransfer, it is automatically locked and inaccessible for all other users who would try to synchronize it, until you close the file at the end of the editing process.
-
In the file explorer, select the file you want to lock.
-
Right click the file you want locked, then select WebSynchro>Lock.
-
To unlock it, right click the file and select WebSynchro> Unlock.
Please note
If you forget to lock a file and a collaborator using WebSynchro intervenes on it locally, WebSynchro will duplicate this file to keep both their changes and yours.
Delete a synchronization
You can choose, at any time, to delete a synchronization you no longer need.
-
Access your WebSynchro application.
-
In the My Syncs tab, click the three dots at the end of the synchronization line you want to delete.
-
Click Delete the synchronization.
Folders will remain available as they are, both on your computer and in your Oodrive Work or Oodrive Work_share online collaboration application but will no longer be synchronized with each other.
Ressources