 Help Center
 Go to Oodrive
Create a new share
Introduction to share types
Oodrive Work allows you to share your sensitive documents and folders securely with your internal and external collaborators.
There are two categories of shares:
Unauthenticated shares:
This category includes shares via email, drop boxes and shares via link. These types of shares enable you to transfer or collect files without your collaborators needing to log in to the workspace.
Authenticated shares:
This category relates to collaborative shares, which involve making a file available to your collaborators so that you can work together on a joint project. This type of share precisely manages the permissions granted to each individual, and therefore requires recipients to log in to the workspace.
The types of shares you will have access to depend on the configuration settings applied by your workspace administrator.
Only unauthenticated shares are available within teamspaces.
Please note
When performing unauthenticated shares (via email or drop box), creating a contact on the fly depends on the settings configured by the administrator of your workspace.
Create a share via link
Share your files using a hyperlink
-
Browse the file manager and select the item(s) you want to share.
-
Click the Share button along the top of the page and select Create link.
-
Fill in the title of the share if desired, then change the sharing options according to your preferences:
☑ Share end date
☑ End-of-share alert
☑ Password
☑ Send me an activity summary
☑ Apply watermark
-
Once you have finished, click Create link.
-
Click Copy link, then forward the sharing link to your recipients via your chosen method.
Once they have this link, your recipients will be able to access the share, and will have the option of viewing and downloading the items it contains.
Create a share via email
Share your files via a hyperlink embedded in an email.
-
Browse the file manager and select the item(s) you want to share.
-
Click the Share button along the top of the page and select Via email.
-
In the share creation menu, add one or more recipients by searching for a contact or entering a new email address.
Tip
Click
 to select recipients directly from your address book.
 -
Select the share permissions you want to assign to your recipients, then click Next.
-
If desired, fill in the email subject and message.
-
Edit the sharing options according to your preferences:
-
Once you have finished, click Share.
|
☑ Share end date ☑ Delete files when share ends ☑ Password ☑ Apply watermark |
☑ End-of-share alert ☑ Max download limit ☑ Send me an activity summary ☑ Make recipients visible to one another |
Please note
The security options that are available, and the options available for changing them, are dependent on the settings configured by the administrator for your workspace.
Your recipients will receive an email giving them access to the share. Depending on the permissions you have chosen to grant them, they can either download or simply view the shared items.
Create a collaborative share
Share files and folders with workspace colleagues and assign access permissions to each of them.
-
Create a new folder by clicking Create, then Create a folder.
-
Add all the items you’d like to share to the new folder.
-
Select the folder.
-
Click Share, then select Create a collaborative share.
-
In the sharing form, use the address book to add one or more recipients.
Note
To make things easier, a blue check mark indicates which colleagues you can add to a collaborative share.
-
Select the share permissions you want to grant your recipients.
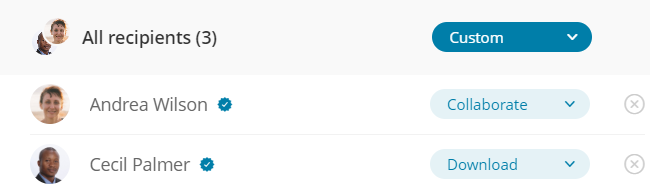
When you create a collaborative folder, you can configure the access rights for all recipients at once or individually.
-
If needed, fill in the subject line and content of the email that will alert recipients to the new collaborative share.
-
Click Next, then modify the sharing options according to your preferences:
☑ Share end date
☑ Add a watermark
☑ Make recipients visible to one another
☑ End-of-share alert
☑ Send me an activity summary
☑ Send recipients an activity summary
-
When you are finished, click Share.
Create a drop box
A drop box is a type of share that allows recipients to upload files to your workspace.
By default, recipients of a drop box can:
-
Upload documents
-
Download and view documents they have uploaded themselves as well as those uploaded by the owner of the drop box
A recipient cannot see what other recipients have uploaded unless the owner of the drop box chooses to make files visible between recipients.
Create a new drop box
-
Create a new drop folder by clicking Create, then Create drop box.
-
Enter the name of your drop box and click Next.
-
Select one or more recipients from the address book and click Add.
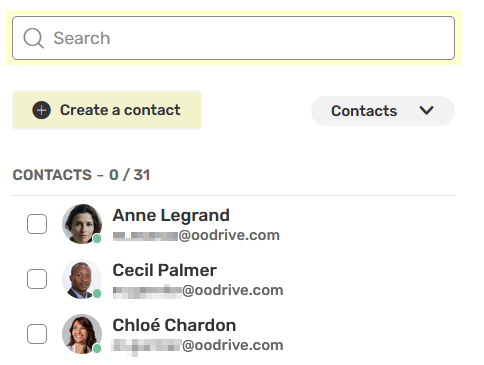
Tip
You can also create a new contact by clicking Create a contact and filling out the form.
-
If needed, fill in the subject line and content of the email that will inform recipients about the availability of a new drop box.
-
Modify the sharing options according to your preferences.
☑ Share end date
☑ Password and/or OTP
☑ Send me an activity summary
☑ Make recipients visible to one another
☑ Make files visible between recipients
Please note
-
When you have finished, click Submit.
Your recipients will receive an e-mail with a link to the drop box.
Convert a folder into a drop box
-
Browse the file manager and select the folder you want to convert into a drop box.
-
Click Share along the top of the page and select Convert to drop box.
-
In the creation menu, add one or more recipients from the address book and click Add.
Tip
You can also create a new contact by clicking Create a contact and filling out the form.
-
If needed, fill in the subject line and content of the email that will inform recipients about the availability of a new drop box.
-
Modify the sharing options according to your preferences.
☑ Share end date
☑ Password and/or OTP
☑ Send me an activity summary
☑ Make recipients visible to one another
☑ Make files visible between recipients
Please note
-
When you have finished, click Submit.
Your recipients will receive an e-mail with a link to the drop box.
Make a quick share
Quick sharing allows you to quickly share items available on your computer, without having previously uploaded them onto your workspace.
This feature is only available in My space.
Quick share via link
-
Go to the My Space section of your Oodrive Work application.
-
In the navigation panel, click Quick share.

-
From your computer's file explorer, select the files and folders to share, then drag and drop to the quick share window.
Tip
Click Add from the app to select files from your workspace.
-
Select Share via link and change the sharing options as desired.
-
Click Share via link.
-
Click Copy link, then forward the sharing link to your recipients via your chosen method.
Quick share via email
-
Go to the My space section of your Oodrive Work application.
-
In the navigation panel, click Quick share.
-
From the file explorer on your computer, select the files and folders you’d like to share, then drag-and-drop the selected items into the quick share window.
Tip
Click Add from the app to select items from your workspace.
-
Select Share via email.
-
In the Send to section, browse for contacts or enter a new email address to add one or more recipients.
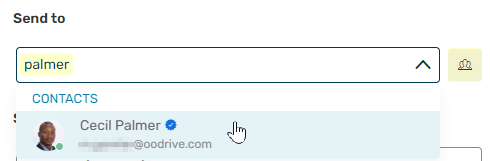
Tip
Click
to select the recipients directly from your address book or to create a contact quickly via the Create a contact button. -
If needed, enter the contents of the email message.
-
Modify the sharing options according to your preferences:
☑ Share end date
☑ Delete files when share ends
☑ Password
☑ Apply watermark
☑ End-of-share alert
☑ Max download limit
☑ Send me an activity summary
☑ Make recipients visible to one another
-
When you are finished, click Share via email.
The recipients will receive an email containing a link allowing them to access and download the shared items.
Ressources