
 Oodrive Work
 Oddrive Meet
 Administration
Settings management

As an Administrator, you have the ability to configure sharing, e-mail and file options on your workspace in order to customize its features and adapt it to fit its intended use within your organization.
Maintain greater control over workspace files and shares by configuring the following options:
-
Authorized share types
-
Duration of share
-
Password protection
-
Dynamic watermark
-
Personalization of sharing emails
-
Memos
-
Number of file versions
-
Sender email address (notifications)
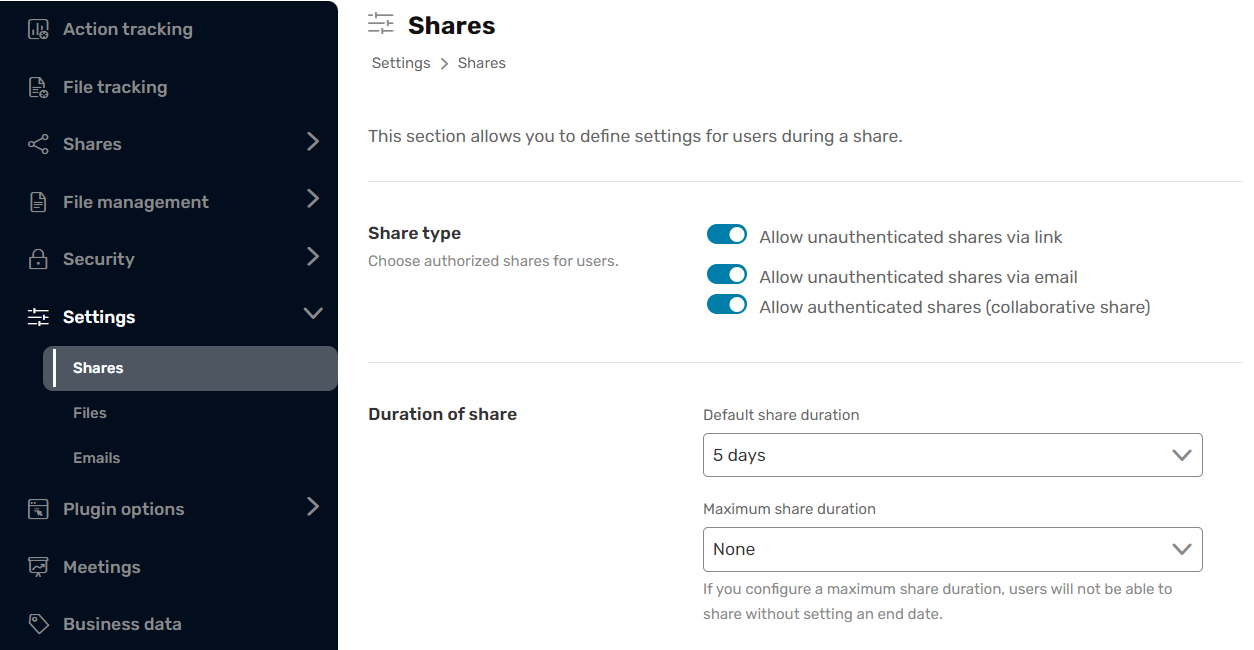
Share settings
Authorized share types
By default, all types of sharing are enabled on your workspace.
As an administrator, you can choose which share types are allowed on your workspace, depending on your business needs and your organization's security policy.
You can:
-
Allow / forbid sharing via link.
-
Allow / forbid sharing via email and drop box.
-
Allow / forbid collaborative sharing.
For example, if you wish to restrict use of the workspace to internal collaboration, you can restrict sharing exclusively to collaborative folders, accessible only to users with an account on that workspace.
This prevents any external distribution via hypertext link, e-mail or attachment (PostFiles plugin).
Conversely, if you want your workspace to be used for file transfer only, you can disable collaborative sharing and authorize sharing via link or e-mail.
Note
For more details on the different share types, please consult this sharing comparative document.
Allow / forbid sharing via link
-
In the navigation panel along the left side of the page, select Settings, then Shares.
-
Enable or disable the Allow unauthenticated shares via link toggle switch.
-
Click Save twice, then click Confirm to confirm your choice.
If you choose to disable sharing via link, existing shares will be deactivated and the feature will no longer appear on your workspace.
Go back to Share type to enable or disable sharing via link in your workspace.
Allow / forbid sharing via email
-
In the navigation panel along the left side of the page, select Settings, then Shares.
-
Enable or disable the Allow unauthenticated shares via email toggle switch.
-
Click Save twice, then click Confirm to confirm your choice.
If you choose to disable sharing via email, existing shares will be deactivated and the feature will no longer appear on your workspace. This includes drop boxes.
Go back to Share type to enable or disable sharing via email in your workspace.
Allow / forbid collaborative sharing
-
In the navigation panel along the left side of the page, select Settings then Shares.
-
Disable the Allow authenticated shares (collaborative share) toggle switch.
-
Click Save twice, then click Confirm to confirm your choice.
If you choose to disable collaborative sharing, existing shares will be deactivated and the feature will no longer appear on your workspace.
Go back to Share type to enable or disable collaborative sharing in your workspace.
Duration of share
Manage the lifecycle of files shared via email from your company workspace or from your personal inbox using the PostFiles plugin:
-
The default share duration, allows you to define a default end-date value for files shared from your company workspace. However, it should be noted that this value will only be applied if the sender chooses to apply the end-date option when sharing the files/folders.
-
The maximum share duration, allows you to restrict the maximum amount of time for which files may be made available when shared from your company workspace.
-
In the navigation panel along the left side of the page, select the Settings section.
-
In the Duration of share section, click the Default share duration drop-down menu to set the default file availability period (from 1 day to 3 years).
-
If you want to enforce a limit on the availability of shares, click the Maximum share duration drop-down menu to set the maximum file availability period (from 1 day to 3 years).
-
Click Save.
Return to this section at any time to make changes.
End-of-share alert
By default, users who define a share end-date can choose to receive an end-of-share alert. When enabled, the sender of the share receives an email notification 48 hours before the share expires, and can modify the share-end date if an extension is needed.
-
In the navigation panel along the left side of the page, select Settings.
-
To manage the end-of-share alert settings, go to the Duration of share section and click the End of share alert drop-down menu.
-
Select a default behavior for the end-of-share alert:
-
Disabled, modifiable by user
-
Disabled, non modifiable by user
-
Enabled, modifiable by user
-
Enabled, non modifiable by user
If you allow users to modify this setting, they will be able to choose whether to enable the end-of-share alert.
-
-
Click Save.
Return to this section at any time to make changes.
Password protection
Add an additional layer of security to shared files by activating password protection on your workspace.
By default, users will be able to deactivate password protection on a file by file basis. However, if you would like, you can change this setting to require the use of a password to access all shared files.
There are two password protection options:
One-time password (OTP)
Available for sharing via email only, this password is generated and sent by the platform automatically when a recipient tries to access the share. It can only be used once and expires after 30 minutes.
Personalized password
Available for sharing via link or email, this password is defined by the owner of the share. It is the same for all recipients and can be used more than once.
-
In the navigation panel along the left side of the page, select Settings then Shares.
-
To manage the password protection settings, go to the APccess torotect share section and click the drop-down menu corresponding to the option you'd like to enable :
Protection via OTP (one-time password)
Protection by personalized password
-
Select a default behavior for the password protection option:
-
Disabled, modifiable by user
-
Disabled, non modifiable by user
-
Enabled, modifiable by user
-
Enabled, non modifiable by user
If you allow users to modify this setting, they will be able to choose whether to enable password protection.
-
-
Repeat these steps if you'd like to configure a second password protection option.
-
Click Save to activate this option on your workspace.
Return to this section at any time to make changes.
Restriction of access permissions
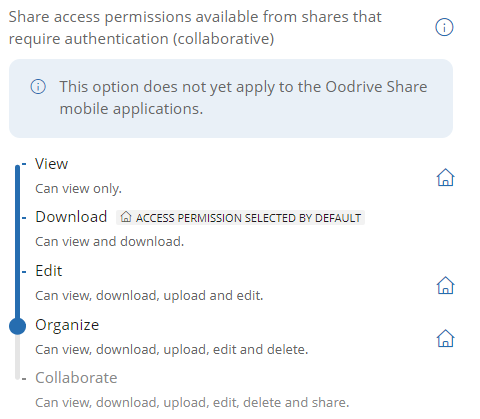
Maintain better control over collaborative shares by defining which access permissions you want to make available to workspace users.
The Share permissions section allows you to define the highest access permissions level that users can assign to recipients of their collaborative shares.
-
In the navigation panel along the left side of the page, select Settings then Shares.
-
To define which access permissions may be assigned to a share recipient, go to the Share permissions section and drag the cursor to the highest access permission level you want to make available to users:
Access permissions
Actions available to share recipient
View
view only.
Download
view and download.
Edit
view, download, upload and edit.
Organize
view, download, upload, edit and delete.
Collaborate
view, download, upload, edit, delete and share.
-
To define which access permission is selected by default when creating collaborative shares, click the
 icon next to that permission.
 -
Click Save.
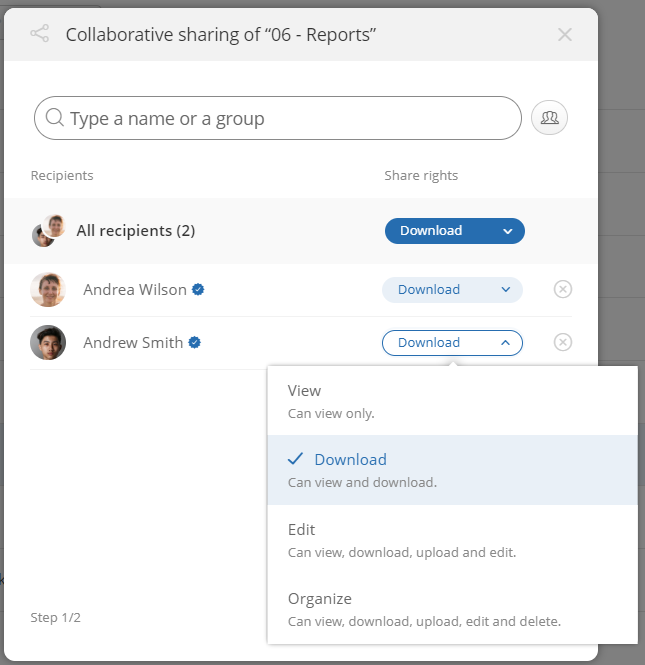
Only the access permissions selected in the Share permissions section will be displayed when workspace users create collaborative shares.
|
Restriction of access permissions in the Sharing Administration module |
Available access permissions when creating a collaborative share |
Please note
The restriction of share access permissions has no impact on existing collaborative shares, unless the owner attempts to modify the share. In this case, the owner will be required to select a new access permission from the list of available options.
Return to this section at any time to make changes.
Delete files when share ends
By default, users can enable a setting that will delete files shared via e-mail once the share expires. When enabled, shared files will be automatically deleted from the workspace at the end-of-share date. However, the deleted files can still be found in their owner's trash.
-
In the navigation panel along the left side of the page, select Settings.
-
To manage the automatic deletion settings, go to the Shared files section and click the Automatic deletion of files when share expires drop-down menu.
-
Select a default behavior for the automatic deletion of files:
-
Disabled, modifiable by user
-
Disabled, non modifiable by user
-
Enabled, modifiable by user
-
Enabled, non modifiable by user
If you allow users to modify this setting, they will be able to choose whether to enable automatic deletion of files when a share expires.
-
-
Click Save.
Return to this section at any time to make changes.
Dynamic watermark
Enable the dynamic watermark option to better protect shared workspace files. When enabled, this option automatically transforms shared Microsoft Office, TXT and AutoCAD files into dynamically watermarked PDFs.
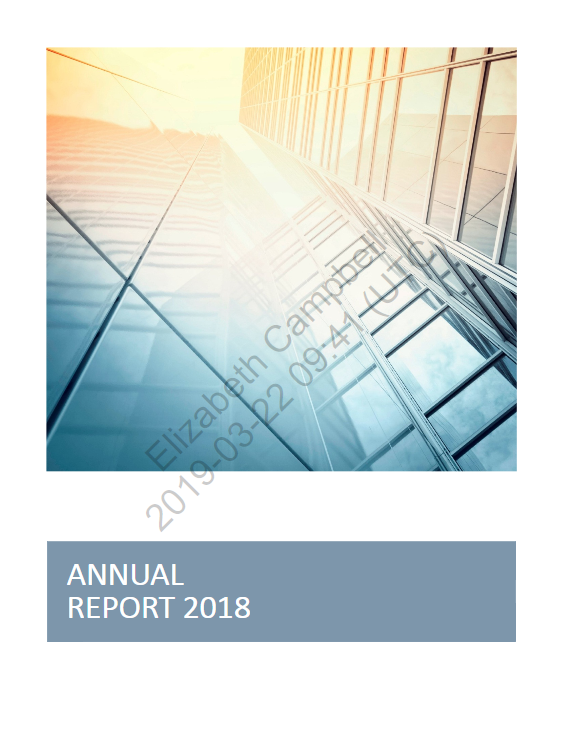
As a result, once the share is received and viewed/printed/downloaded, every page of the document will include the share recipient’s name and the date of the share. However, when a file is shared via link, the link creator’s information is displayed instead of the recipient’s.
Please note
When using this option with the PostFiles plugin, all email attachments will be automatically transformed into PDF files when shared, regardless of the actual format of the file(s) attached. The dynamic watermark does not apply to video or image file formats.
-
In the navigation panel along the left side of the page, select Settings then Share options.
-
Define the share types for which you want to enable the dynamic watermark by selecting the corresponding option:
Add a watermark to files shared via email or link
Add watermark to collaborative shares
To allow the user to modify this setting, select Allow the user to change this option.
To prevent the user from modifying this setting, deselect the option Allow the user to change this option.
-
Click Save to activate on your workspace.
Below is an example of a document visualized with the dynamic watermark option applied:
Return to this section at any time to make changes.
Personalization of email content
This option, which is enabled by default, allows workspace users to personalize the content of sharing emails.
You can disable/re-enable this option at any time in the share options.
-
In the navigation panel along the left side of the page, select Settings and then Shares.
-
Enable or disable the Allow personalization of e-mail content setting to allow or prevent personalization of sharing emails.
-
Click Save.
Return to this section at any time to make changes.
File settings
Memos
This option allows platform users to create memos on files and folders they own, or which were made available to them through sharing.
Users can create memos for various purposes, for example:
Adding personal annotations to their own files and folders
Collaborating on a remote project without marking documents with annotations
Collaborating on documents for which they do not have modification rights
Participating in a digitized validation process
Please note
The owner of each file can delete memos added by their colleagues.
-
In the navigation panel along the left side of the page, select Settings and then Files.
-
Select Enable memos.
-
If you want to enable the option to tag other users, select Authorize users to tag other users and click Enable.
Users will be able to tag colleagues in memos to draw their attention to a message. Email notifications are automatically sent to the tagged users.
-
Click Save to activate on your workspace.
Return to this section at any time to disable these options.
If you disable memos, memos created by users will no longer be accessible on the workspace, but they will be kept in memory and restored if the option is re-enabled at a later date.
Maximum number of versions allowed
The collaboration application automatically generates a new version each time a file is edited on the platform. By default, the platform keeps the ten latest versions of a file, so that users may retrieve an earlier version if needed.
As an Administrator, you can define the maximum number of versions to keep for workspace files.
Careful
If you enter a number of versions that is less than the previous setting, all additional versions will be permanently lost.
-
In the navigation panel along the left side of the page, select Settings, then Files.
-
Enter the number of versions to keep in the Maximum number of file versions field.
-
Click Save to update the maximum number of versions allowed on your workspace.
Return to this section at any time to make changes.
Email settings
When collaborating within the Oodrive solution, users will automatically receive email notifications about shared files and platform activities.
By default, these notifications are sent from the address “notifications@oodrive.com”. The sender name, however, depends on the type of notification:
“Notification” for general platform activity notifications
The first and last name of the user who created an account or a share
As an administrator, you have the option to customize both the sender address and the sender name.
Configure the sender email address
You can set up a generic sender address for the notifications sent by the platform. You can also choose to use this address to centralize responses from recipients.
-
In the navigation panel along the left side of the page, select Settings and then Emails.
-
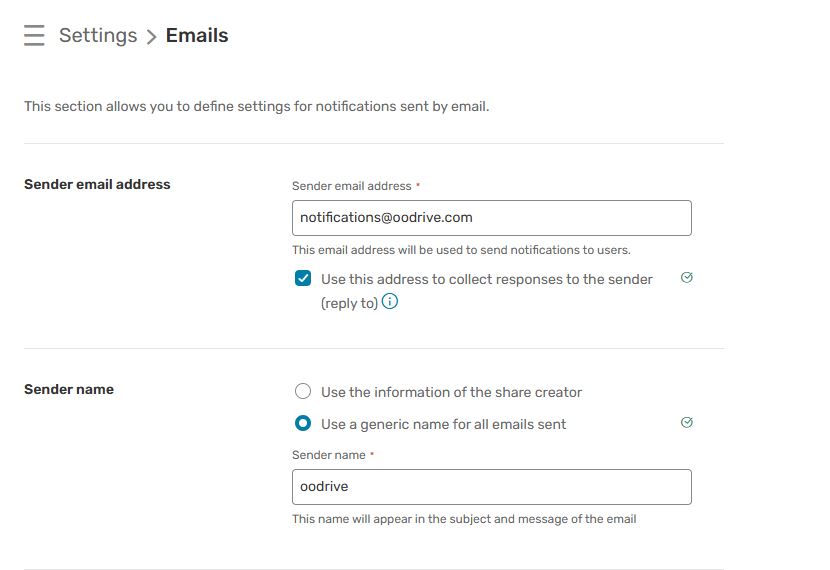
Go to the Sender email address section and enter a new sender email address in the field provided.
-
If you want recipients' replies to be redirected to this mailbox, check the box Use this address to collect responses to the sender (reply to).

-
Click Save.
Modify the sender emails at any time by returning to the Emails section and saving your changes.
Set up a generic sender name
By default, when a user creates an account or a share (collaborative, via drop box, or via email), their name appears as the sender in the notification emails sent to recipients.
However, it is possible to configure a generic sender name that will replace the personal information of the user who performed the action.
-
In the navigation panel along the left side of the page, select Settings and then Emails.
-
Go to the Sender name section and select Use a generic name for all emails sent.
-
Enter the generic name you would like to use in the field and click Save.
This name will appear in the email subject line and message body.
Resources