 Help Center
 Go to Oodrive
Manage existing shares
You can modify or delete a share at any time. Below is the list of actions you can perform to manage your existing shares:
Disable/re-enable a share
Change recipients and their sharing permissions
Change sharing options (end date, security options, email message, etc.)
Automatically forward the access link to a share
Delete a share
Please note
The available actions when modifying a share may depend on the type of share (via link, via email or collaborative).
Modify your shares
Modify shares individually
Modify recipients and sharing options
-
In the navigation panel, click Share management > Shares sent.
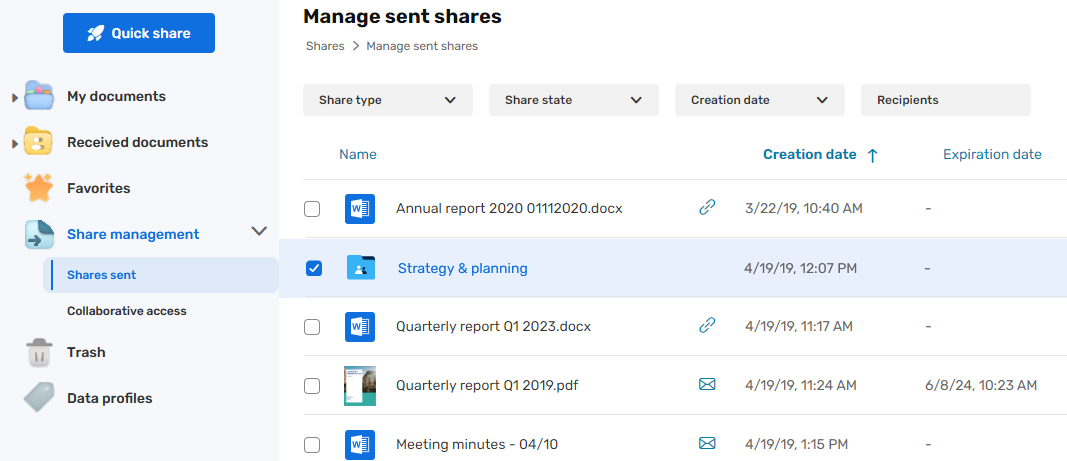
You view all your shares
-
Use the filters along the top of the page to locate a specific share.

-
Click on the share you’d like to modify to view its details.
-
Click Modify.
-
To update your changes, click Validate.
Please note
If your share has been re-shared by a colleague, you won’t be able to modify the new share, but you will be able to disable or delete it.
Disable or re-enable share
A share that has been disabled can no longer be accessed by recipients, but may be re-enbled and made available to your colleagues once again at a later date.
-
In the navigation panel, click Share management > Shares sent.
-
In the share item you’d like to modify, click on the toggle switch.

When the toggle switch is grayed out, the share is inactive

When the toggle switch is blue, the share is active
Modify shares in bulk
You can perform bulk actions on your shares.
The following actions can be carried out simultaneously on multiple shares:
-
Modify the share end date
-
Deactivate or reactivate the share
-
Delete the share
Please note
Some shares do not meet the requirements for bulk editing and can only be deleted. Known as "invalid" shares, they will need to be modified individually because they contain an error to be fixed.
A share can be considered invalid for the following reasons:
-
It was sent to a recipient who no longer exists (deleted)
-
It contains a shared item that no longer exists (deleted)
-
It has been configured with permissions that have later been restricted by the workspace administrator
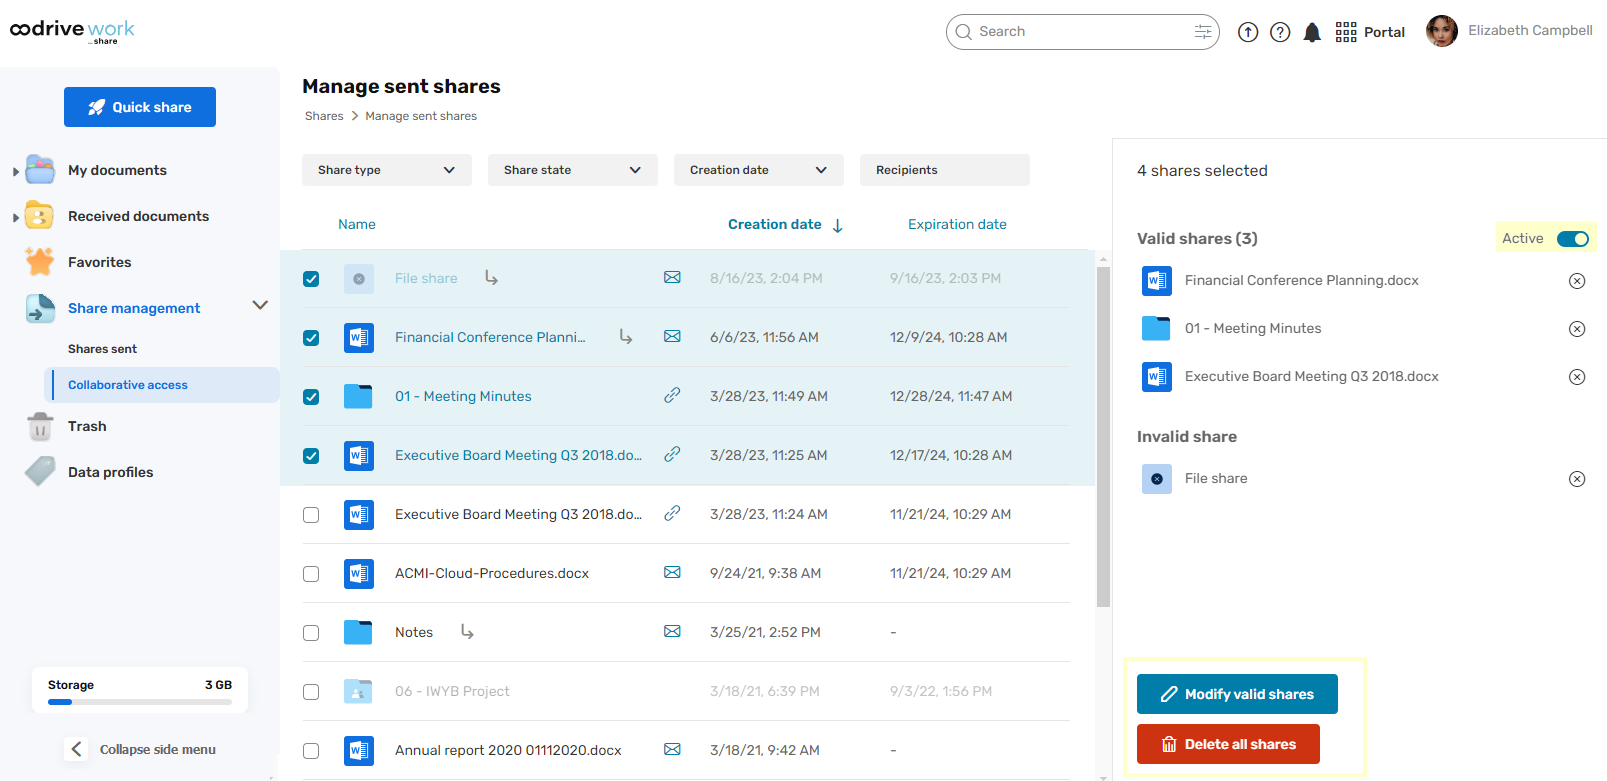
If your selection contains both valid and invalid shares, changes to the share end date and/or status will only apply to valid shares, while deleting will apply to the entire selection.
-
Log in to your workspace and access your collaboration app.
-
In the navigation panel on the left, click Share management, then Shares sent.
-
Select the shares you want to modify.
-
Modify the selected shares.
-
To modify the share end date: In the panel on the right, click Modify valid shares, enter the new share end date, then click Edit.
-
To enable/disable shares: In the panel on the right , use the the toggle switch next to Valid shares to change the status of your shares.
-
To disable a selection of active shares, click on the toggle switch and then on Disable.
-
To reactivate a selection of inactive shares, click on the toggle switch and enter a new share end date before clicking Change and re-enable.
-
To change the active/inactive status of a mixed selection, click the Several Statuses toggle switch. Then, select the action to perform on all shares and confirm your choice.
-
-
To delete shares: In the panel on the right, click Delete all shares and then Delete.
-
Manage access to your collaborative shares
Manage your collaborative shares from the Share management > Collaborative access section. You can:
Consult an overview of your collaborative shares arranged either by recipients or by collaborative folders.
Make individual changes to recipient access permissions.
Make batch changes to recipient access permissions via an XLSX or CSV file.
Update user access permissions individually
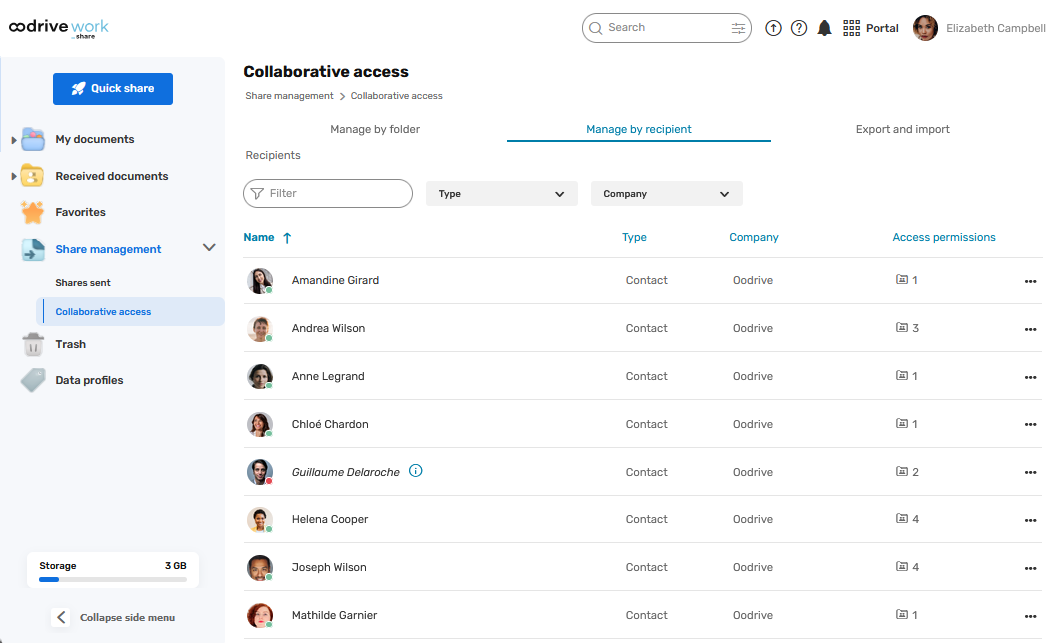
Manage your collaborative shares by recipient
The Manage by recipient tab provides you with a quick overview of all recipients of your collaborative shares. You can use the supplied filters to find a particular recipient. From this section, you can also modify recipients’ access permissions to one or more of your shares.
-
Log in to your workspace and access your collaborative application.
-
In the navigation panel on the left, select the Share management > Collaborative access section, then go to the Manage by recipient tab.
-
In the Manage by recipient tab, sort the display order of your recipients by clicking the column titles:
Name
Type of recipient (contact or group)
Company
Access permissions (number of folders collaboratively shared with the recipient)
Use the search bar and filters to search for a specific recipient.
-
Click the recipient whose access permissions you want to modify.
-
Modify the permissions assigned to the recipient for one or more collaborative shares.
To modify the permissions assigned to the recipient for a specific share, click on the permission in the right-hand column, then select the access permission you want to assign to the recipient for this specific share.
To modify the permissions assigned to the recipient for all collaborative folders you have shared with that recipient, go to the first line with the title All collaborative folders and select the permission you want to assign to the recipient for all collaborative folders to which that recipient has access.
Note
In the event of an error, you can click
 to the right of the modified access permission to cancel your changes.
 -
Once you have finished, click Save at the bottom of the page, then click Confirm.
Note
To remove the recipient’s access to all the collaborative shares in which they are included, click the ![]() button or right-click the recipient in question, then click Remove all access permissions.
button or right-click the recipient in question, then click Remove all access permissions.
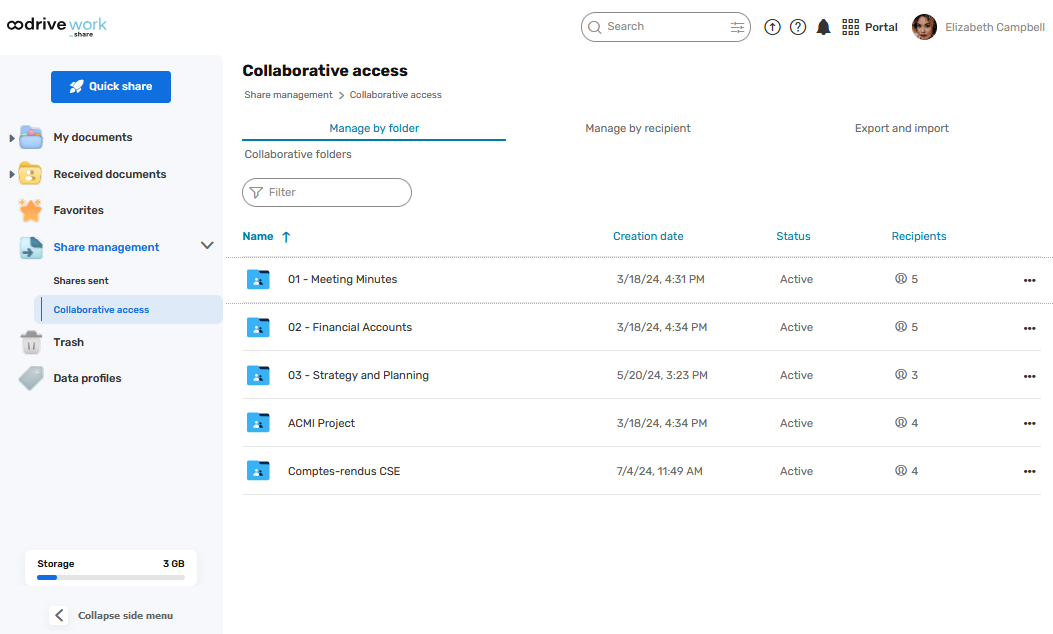
Manage your collaborative shares by collaborative folder
You can quickly browse all of your collaborative shares, arranged by folder, and manage recipients’ access permissions to these folders via the Manage by folder tab.
-
Log in to your workspace and access your collaborative application.
-
In the navigation panel, select the Share management > Collaborative access section, then go to the Manage by folder tab.
-
In the Manage by folder tab, sort the display order for your collaborative shares by clicking the column titles:
Name
Date created
Share status (active or inactive)
Recipients (number of recipients for the collaborative share)
Use the search bar to search for a specific collaborative folder.
-
Select the collaborative folder for which you want to modify access permissions for one or more recipients.
-
Modify the permissions assigned to one or more recipients for a given collaborative share.
To modify the permissions assigned to a specific recipient of this share, click the drop-down menu in the Access permissions column, then select the level of access you want to assign to the recipient for this specific share.
To modify the permissions assigned to all recipients of this share, go to the first line with the title All recipients and select the level of access you want to assign to all recipients of the share.
Note
In the event of an error, you can click
to cancel your changes.
-
Once you have finished, click Save at the bottom of the page, then click Confirm.
Note
To delete a collaborative share, right-click the collaborative share in question, then click Delete the share.
For quick access to the content of a collaborative share in the file manager, click
 or right-click the collaborative share in question, then click Go to the folder.
Update user access permissions in bulk
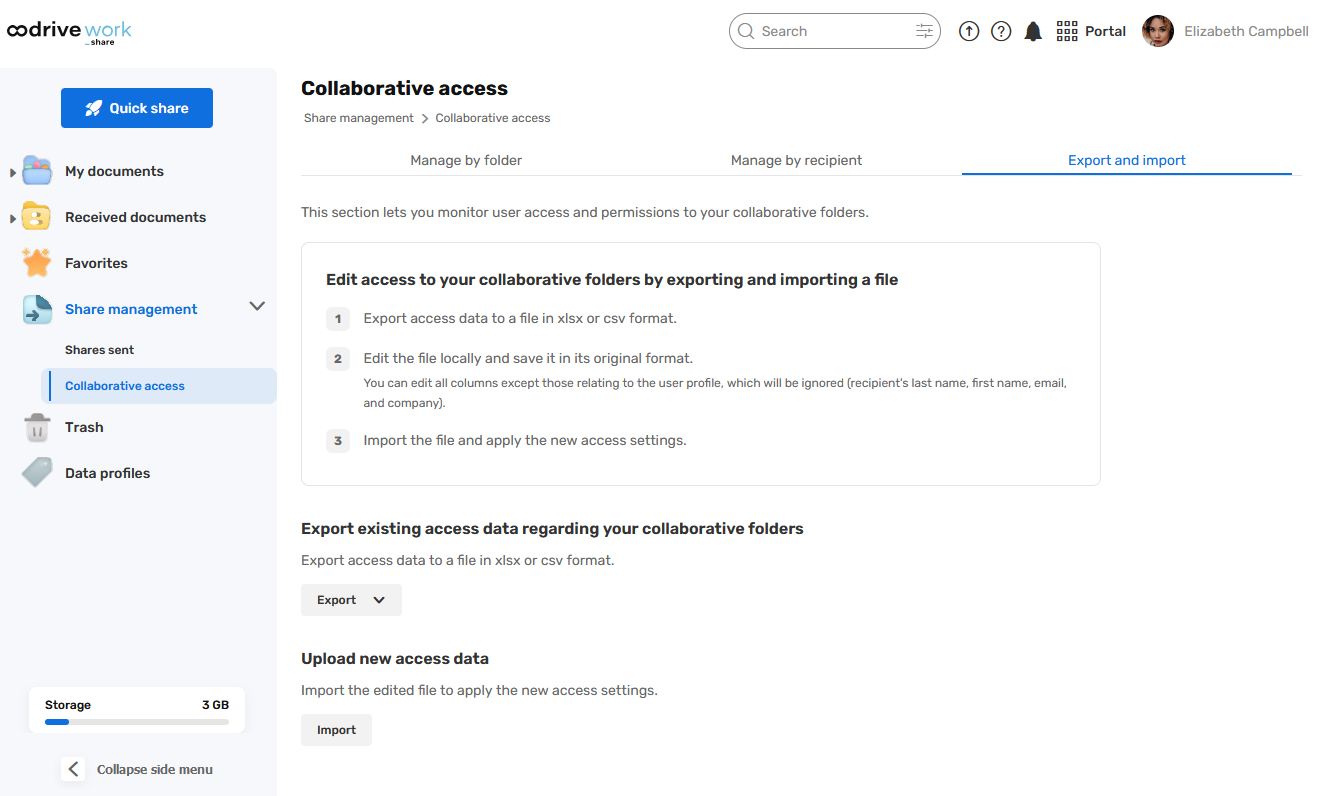
You can manage access permissions to your collaborative shares in the Share management > Collaborative access > Export & import section of your application.
To manage access permissions in bulk, you need to export an Excel or CSV file. This file lets you retrieve and update the access permissions of recipients associated with your collaborative folders in bulk. Once the changes have been made, import the updated file to your workspace to update your collaborative shares.
Note
You cannot use the export file to edit user information or the share status (active versus inactive). Sender and recipient unique identifiers (senderUUID and recipientUUID) automatically determine this information.
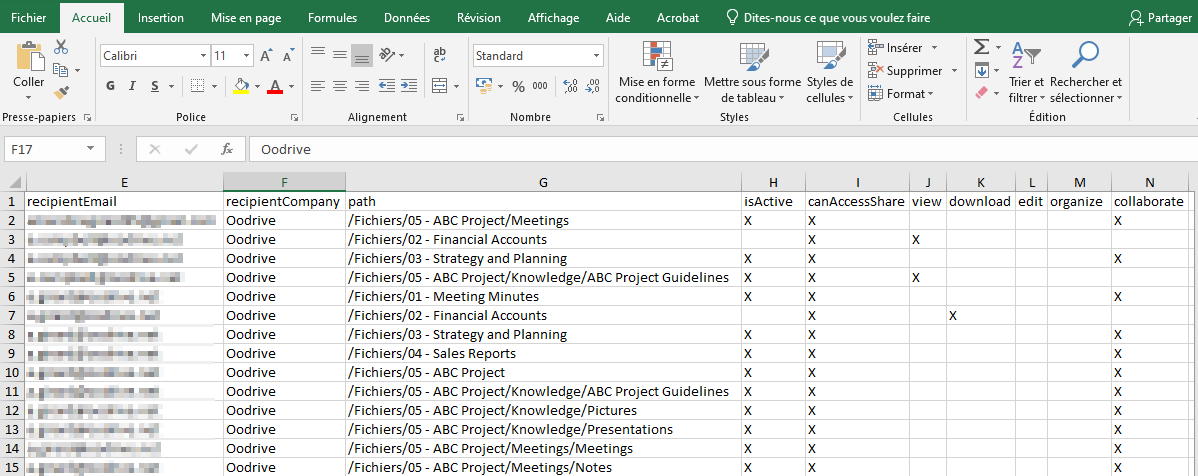
Below, you will find a description of the columns in the access permissions file:
|
Column title |
Description |
|---|---|
|
senderUUID |
Sender’s unique identifier |
|
recipientUUID |
Recipient’s unique identifier |
|
sender |
Sender’s name |
|
recipient |
Recipient’s name |
|
recipientEmail |
Recipient’s email address |
|
recipientCompany |
Recipient’s company |
|
path |
Collaborative folder path shared by the sender |
|
isActive |
The share is active if the box is selected. |
|
canAccessShare |
The recipient is included in the share if the box is selected. |
|
view |
The recipient can access the share in view-only mode if the box is selected. |
|
download |
The recipient can view and download the share content if the box is selected.. |
|
edit |
The recipient can view, download, upload, and edit the share content if the box is selected. |
|
organize |
The recipient can view, download, upload, edit, and delete the share content if the box is selected. |
|
collaborate |
The recipient can view, download, upload, edit, delete, and share the share content if the box is selected. |
Step 1: Export the access permissions file
-
Log in to your workspace and access your collaborative application.
-
In the navigation panel on the left, select the Share management > Collaborative access section then go to the Export and import tab.
-
In the Export existing access data regarding your collaborative folders section, click Export and select a file format to download (XLSX or CSV).
The download will start automatically in your browser.
-
Once the download is complete, open the file and save it to your computer.
Step 2: Edit access permissions
-
Open the downloaded export file on your computer.
-
Browse the file and find the collaborative share recipient whose access permissions you want to edit by looking in the recipient column.
-
Once you have found the relevant recipient, find the target collaborative share by looking in the path column.
-
Edit user access permissions.
-
To modify a user's permissions: move “X” to the column which corresponds to the permission set that you want to assign:
view to view
download to view and download
edit to view, download, upload, and edit
organize to view, download, upload, edit, and delete
collaborate to view, download, upload, edit, delete, and share.
You must select only one box with “X” among the available permission sets, because these are sorted in ascending order of the granted permissions. The further you move “X” to the right, the more permissions the user will have and vice versa.
-
To remove a user from a collaborative share: only remove “X” from the canAccessShare column.
-
To add a user to a collaborative share: the user must already be part of an existing collaborative share. If this is the case, you can retrieve the user's recipientUUID as well as the information required to add and complete a line in the file.
-
-
Repeat steps 2, 3 and 4 until you have finished.
-
Once you have made your changes, save the file to your computer.
Step 3: Import the access permissions file
-
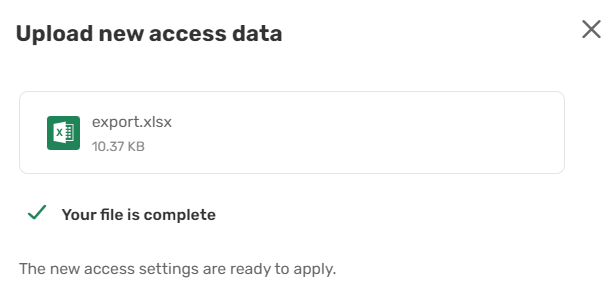
In the Share management > Collaborative access > Export and import section, click Import along the bottom of the page.
-
In the window that appears, click on Browse my files to select the edited access permissions file saved on your computer.
-
Click on Confirm and apply to update your collaborative shares.
Note
An error message may appear during import, for instance if your file contains access permissions that have been removed from the workspace by your administrator.
No changes will be taken into account if your file contains errors during import, and a message will tell you the position and character of the errors to help you complete your import successfully.
Resend an access link
If one or more of your collaborators has lost their access link to a share – for example, by deleting the email that contained it – you can resend it without having to create a new share.
-
In the navigation panel, click Share management > Shares sent.
-
Select the share for which the access link has been lost.
-
If it is a collaborative or email share, click Resend invitation in the right-hand panel. The sharing email will be resent to all recipients.
-
If it is a share via link, click Copy link and send it to your recipient via the method of your choice.
Delete a share
If you want to temporarily block access to a share, you could choose to disable it instead.
To delete a share:
-
In the Share management > Shares sent section, identify the share you’d like to delete.
-
From the Details tab on the right, click Delete.
-
To permanently delete the share, click Delete.
Please note
Deleting a share does not delete the original files from your documents.
Ressources