 Help Center
 Go to Oodrive
Installing and configuring EasyTransfer manually
Install EasyTransfer
The installation of the EasyTransfer desktop application does not require local administrator permissions on the user's computer.
Once the application is installed, transfers between the local computer and the Oodrive workspace are managed via EasyTransfer, in silent mode.
Download and install EasyTransfer
-
Go to your collaborative application.
-
Click your profile in the upper-right corner of the screen and select Applications.
-
Go to the EasyTransfer section, then download the application for Windows
-
Go to your Downloads folder and double-click the EasyTransfer-xxx.exe installer.
-
Follow the steps in the installation wizard.
Link EasyTransfer to your Oodrive Work_share workspace
The EasyTransfer application must be linked to your browser and your workspace. After installation, a pairing procedure appears when you log in to your online space.
-
Go to your collaborative application.
-
Two windows are displayed, prompting you to link your browser with EasyTransfer:
the first, generated by your online workspace, contains an automatic pairing code
the second, generated by EasyTransfer, asks you to enter this code to finalize the pairing process
-
Copy and paste the pairing code into the EasyTransfer window, then click OK.
A confirmation message indicates that the application is linked to the platform, and the EasyTransfer application icon appears in your computer's task bar.
Configuring EasyTransfer
You can access the app settings using the icon in the upper-right corner of the main screen.

General settings
-
Double-click the EasyTransfer icon
 in the task bar.
 -
Click the Settings icon in the upper-right corner of the application.
-
In the General tab, make the configuration of your choice. You can:
-
Enable application launch when the computer starts
-
Choose the app language
-
Access the backup folder for locally edited files
-
Choose the action to perform after downloading (open files, open parent folder, do nothing)
-
-
When you have finished, click OK to save your configuration.
Network settings
-
Double-click the EasyTransfer icon
in the task bar. -
Click the Settings icon in the upper-right corner of the application.
-
In the Network tab, make the configuration of your choice. You can:
-
Check and modify the communication ports
-
Define bandwidth limits for transfers (download and upload)
-
Define proxy settings
-
-
When you have finished, click OK to save your configuration.
Configuring a proxy
When using Chrome, Firefox or Edge
Using EasyTransfer with Chrome, Firefox or Edge requires no additional proxy configuration. The port used to communicate with these browsers is 19488.
When using Internet Explorer or Safari
For these browsers, the WebSocket used is a secure server listening on port 19487. Because the Oodrive Work_share web application loads in HTTPS, Internet Explorer and Safari require that any connection made via the JavaScript code of the web page also uses a secure protocol. As a result, the WebSocket connection must also be secure, even though this is a local connection (since EasyTransfer runs on the same computer as the browser).
By default, web browsers do not accept self-signed certificates. As a result, a certificate provided by a certification authority is required. However, certification authorities cannot provide certificates for localhost, this is why we use the domain name local.easytransfer.cloud.
In most configurations, the browser does not go via the potential proxy to connect to a local address. In this case, it cannot know that the local.easytransfer.cloud domain corresponds to a local address.
Without telling the browser not to go through the proxy for this domain, the browser requests the proxy to connect to local.easytransfer.cloud. The proxy fixes this address in 127.0.0.1 and therefore tries to connect to itself on the EasyTransfer port (19487, by default), which of course doesn’t work.
To set up the proxy, the local.easytransfer.cloud domain must be added to the proxy exceptions.
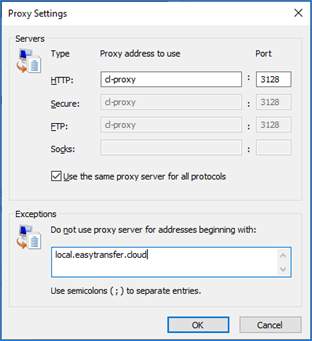
If you use an automatic configuration script for the proxy, this script must be edited to include an exception for the local.easytransfer.cloud domain.
To do this, simply add the following line in the FindProxyForURL function:
if (host == "local.easytransfer.cloud") { return "DIRECT"; }
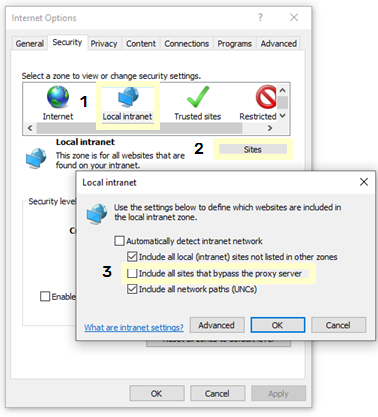
Specific case for Internet Explorer: Request the browser to exclude sites that bypass the proxy server as a local intranet site.
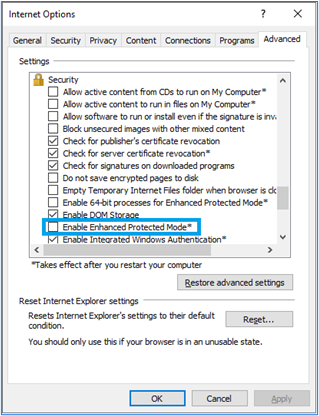
Enhanced Protected Mode must also be disabled:
Important
Adding the local.easytransfer.cloud domain to the proxy exceptions does not pose any security problems, since the connection is carried out entirely locally, without leaving the user’s computer.
Resources