 Help Center
 Go to Oodrive
Configuring advanced settings
As a User responsible for administrating user provisioning, you can configure several advanced settings for the Users and Contacts of your workspace.
-
Account suspension and closure
-
Restrictions
-
Email addresses
-
Storage
-
Default language
Automatic suspension
You have the option to activate the automatic suspension of accounts on which there has been no login activity for some time in order to maintain better control over workspace access. Suspending an account allows you to keep all of the User's data and history on the workspace until the account is reopened at a later date.
-
Automatic suspension applies to all accounts, including Users with administrative rights.
-
If the suspended user owns Contacts, their accounts will be closed.
-
If the suspended user has created delegations, these will be suspended and his delegates will no longer be able to access his account.
If enabled, the inactive account holder will receive a notification before their account is suspended and if you would like, you can also to be notified to stay informed.
Recommendation
If a delegator account is mainly active via its delegates, we recommend that you activate the Prevent automatic account suspension option in the user file, to avoid automatic suspension.
Receive suspension notifications
By default, no notifications will be sent to make you aware of account suspensions. If you would like to be notified when accounts are suspended, you must enable this option.
-
Click on the Settings section.
-
In the Account suspension section, check the option Notify workspace managers when a user account is suspended.
-
Click Save along the bottom of the page.
Enable automatic suspension
-
Click on the Settings section.
-
In the Account suspension section, check the option Enable automatic suspension of inactive accounts.
-
Set the time limit before suspending inactive accounts.
-
1 to 6 months or 1 year after the account is marked as inactive
-
-
You must also select when you would like the email alert to be sent to the account holder of the suspended account.
-
the email will be sent out one or two weeks before the account is suspended
-
-
Click Save along the bottom of the page.
Enable automatic closure
-
Click on the Settings section.
-
In the Account suspension section, check the option Enable automatic closure of suspended accounts.
-
Set the time limit before closing suspended accounts.
-
1 to 6 months or 1 year after account suspension
-
-
Click Save along the bottom of the page.
Profile modification
By default, workspace users have the ability to edit their profile. The following information can be modified at any time:
-
Email
-
Username
-
Password
-
Phone
-
Company
-
Department
-
Default language
-
Time zone
-
Mailing address
However, if you would prefer to lock the profile information of certain individuals, you can choose to prevent profile editing.
-
Click on the Settings section and go to Restrictions.
-
if you want to be able to manage modification settings for profile information on the user form of each colleague, make sure that the Allow users to modify their personal information setting is selected.
-
Next to Default modification, select the behavior you want to apply by default:
-
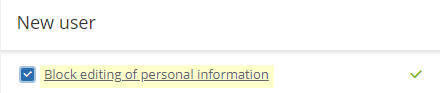
Check Blocked to prevent users from modifying their profile information.
-
Check Authorized to allow users to modify their profile information.
This behavior will be applied by default for all new users created on your workspace. However, you can still choose to modify it in the user form of each individual user.
Note
if you want to block the modification of profile information for all users of your workspace without distinction, de-select the Allow users to modify their personal information setting.
-
-
Click Save along the bottom of the page.
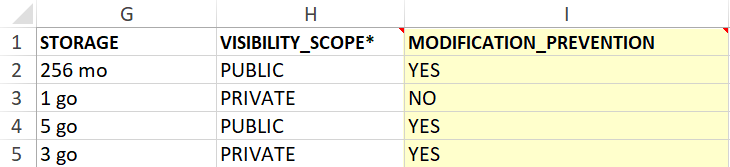
When the Allow users to modify their personal information setting is enabled, you can prevent or allow modification of profile information for the colleagues of your choice, individually or on a massive scale:
|
User form |
File template (XLSX) |
|---|---|
|
|
|
Account visibility
By default, workspace accounts are created in silos, such that Users are not visible to each other and Contacts are only visible to their creator.
However, it can be necessary to make workspace accounts visible to each other in the following situations:
you would prefer to allow workspace colleagues to interact and work together in the Oodrive Work_share and Oodrive Work applications.
you have deployed the Oodrive Save or Oodrive Media application, in which case accounts must be visible to allow user management in the Backup Management and Oodrive Media Administration modules.
you have deployed the Oodrive Meet application, in which case Users must be visible to each other in order to add guests to their meetings.
Once you activate the account visibility option, this option will display in the user form when creating a new account. The provisioning manager will then be able to make each account visible or not.
-
Click on the Settings section.
-
In the Restrictions section, check the option Allow users to be visible to each other. By selecting this option, you are adding an additional option to the account form.
-
You will then be able to set a value by default for this option, either Public or Private.
-
If you have deployed the Oodrive Save or Oodrive Media application, select Public as the default value
-
-
The Visible to other users option will be pre-selected or not by defaulton the user form when creating a new account. The creator of the user can then either keep the default value or modify it.
-
Click Save along the bottom of the page.
Block contact management
By default, collaborators can manage contacts from the address book: they can create, modify and delete contacts.
However, if you prefer to centralize and secure contact management in your workspace, you can choose to prevent contact management by users without administrative rights to user management.
-
Click on the Settings section.
-
In the Restrictions section, check the Lock contact management from the address book option.
-
Click Save along the bottom of the page.
Once the contact management option is enabled, collaborators who do not have access to the Users module will no longer be able to:
-
manage contacts in their address book.
-
to create contacts on the fly when performing unauthenticated shares or sending documents for signature.
Notification sender email address
When your workspace colleagues receive an automatic notification, the default sender address is the following: notifications@oodrive.com
You can change the notification sender address at any time:
-
In the navigation panel on the left side of the page, click on the Settings section.
-
In the Notifications section, change the forwarding address specified in the field.
-
Click Save along the bottom of the page.
The sender address will appear on all notifications sent to workspace users.
Email domain name filtering
In order to ensure better secure and protect your workspace, you have the option to allow only users with trusted domain names or conversely, block users with particular domain names.
Enable email address domain filtering
-
In the navigation panel on the left side of the page, click on the Settings section.
-
In the Email addresses section, check Enable filtering of domains based on email addresses.
-
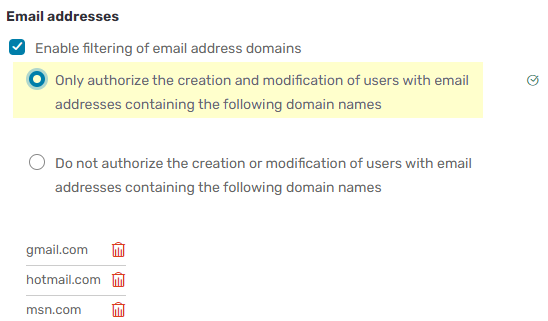
Select how you would like to filter the domain names:
-
by authorizing (filtering by inclusion) or
-
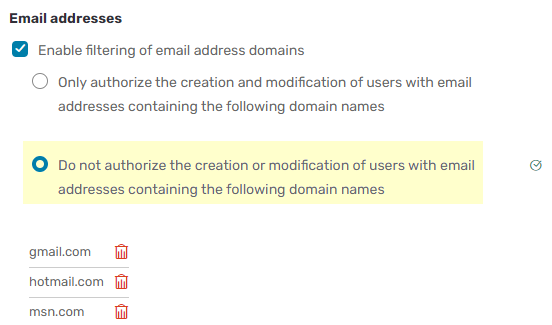
by prohibiting (filtering by exclusion)
-
-
Enter an email address domain name in the field provided (e.g., google.com, Hotmail.com, etc.), then click Add. Repeat the process to add others.
Click Save along the bottom of the page.
Please note
you cannot filter via inclusion and exclusion at the same time.
Filter via inclusion
Filter via exclusion
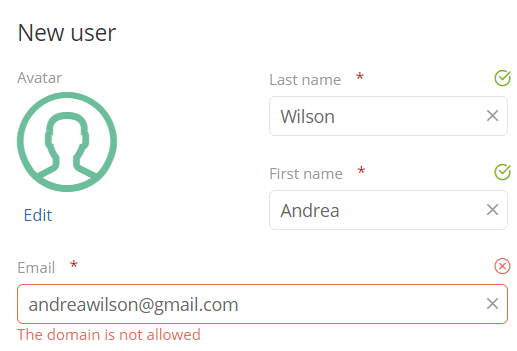
Message received when creating a new user, after entering an email address with a prohibited domain name:
Disable email address domain filtering
-
In the navigation panel on the left side of the page, click on the Settings section.
-
Uncheck the option Enable filtering of domains based on email addresses.
-
Click Save along the bottom of the page.
Your filters will remain available the next time you enable this option.
Remove a domain filter
-
In the navigation panel on the left side of the page, click on the Settings section.
-
Then, click on the recycle bin to the right of the domain name that you want to remove.
-
Click Save to perform the change.
Storage
This section does not apply to workspaces with only Oodrive Media or Oodrive Sign Users.
Several options allow you to configure the storage settings applied to to Users and Teamspaces on your workspace:
-
Advanced setting: minimum storage allows you to set a minimum storage value required when creating a User or teamspace.
-
Default user storage allows you to assign a default storage value to new Users.
-
Default teamspace storage allows you to assign a default storage value to new teamspaces.
-
Maximum storage for a teamspace that can be configured by an owner allows you to set the maximum amount of storage space an owner can allocate to their teamspace.
To add licenses or additional storage space to your workspace, please contact your sales representative.
Advanced setting: minimum storage
This section is dedicated to administrators of Oodrive Work_share, Oodrive Work, Oodrive Meet or BoardNox.
Set a minimum storage value to ensure that all of your Users have the basic storage space necessary to import and share files on your workspace.
For the Oodrive Work solution, this value refers to the minimum storage allocated to the My space and teamspaces sections.
-
In the navigation panel, click on the Settings section and go to Storage.
-
In the Advanced setting: minimum storage field, enter a minimum value, then click on the drop-down menu to select the size unit:
-
Megabyte (MB)
-
Gigabyte (GB)
-
Terabyte (TB)
-
-
Click Save to perform the change.
Default user storage
This section is dedicated to administrators of Oodrive Work_share, Oodrive Work, Oodrive Meet or BoardNox.
Set a default storage value for new users. This will give them the basic storage space to collaborate on in your workspace.This value can be modified by an administrator in the creation form.
For the Oodrive Work solution, this value refers to the default storage allocated to the My space sections.
-
In the navigation panel, click on the Settings section and go to Storage.
-
In the Default user storage field, enter a default value, then click on the drop-down menu to select the size unit:
-
Megabyte (MB)
-
Gigabyte (GB)
-
Terabyte (TB)
-
-
Click Save to perform the change.
Note
The value set in this field must be greater than or equal to that of Advanced setting: minimum storage.
Default teamspace storage
This section is dedicated to administrators of Oodrive Work.
Set a default storage value for new teamspaces to ensure that teamspace members have the storage they need to collaborate.
-
In the navigation panel, click on the Settings section and go to Storage.
-
In the Default teamspace storage field, enter a default value, then click on the drop-down menu to select the size unit:
-
Megabyte (MB)
-
Gigabyte (GB)
-
Terabyte (TB)
-
-
Click Save to perform the change.
Note
The value set in this field must be greater than or equal to that of Advanced setting: minimum storage.
Maximum storage for a teamspace that can be configured by an owner
This section is dedicated to administrators of Oodrive Work.
Teamspace owners can adjust the storage space allocated to their space within the limits you set.
Set a maximum storage value that can be configured by an owner.
-
In the navigation panel, click on the Settings section and go to Storage.
-
In the Maximum storage for a teamspace that can be configured by an owner field, enter a maximum value, then click on the drop-down menu to select the size unit:
-
Megabyte (MB)
-
Gigabyte (GB)
-
Terabyte (TB)
-
-
Click Save to perform the change.
Note
The value set in this field must be greater than or equal to that of Default user storage.
Backup storage
This section is dedicated to administrators of Oodrive Save.
Set a minimum storage value to ensure that all of your Users have the basic storage space necessary to save files through their Oodrive Save client.
-
In the navigation panel, click on the Settings section and go to Storage assigned by default when creating users.
-
In the Backup storage field, enter a minimum value, then click on the drop-down menu to select the size unit:
-
Megabyte (MB)
-
Gigabyte (GB)
-
Terabyte (TB)
Note
In order to use the Oodrive Save, a User account needs a minimum of 1 Gigabyte of storage space. As a result, you are required to enter a minimum storage value greater than or equal to 1 Gigabyte.
-
-
Click Save to perform the change.
Default email language
You can set the default language of emails and notifications sent to workspace users. If no user language is specified when the account is created, the default language will apply.
-
In the navigation panel, click on the Settings section.
-
In the Default email language section, use the drop-down list to select your users’ default language.
-
Click Save to perform the change.
Ressources