 Help Center
 Go to Oodrive
Configuring an external authentication protocol
Before employees start using the workspace applications, you can choose to set up an external authentication protocol that meets the security settings required by your company.
Four external authentication protocols are available to you:
|
Available authentication protocols |
|
|---|---|
|
Lightweight Directory Access Protocol (LDAP) |
Optimal for companies looking to automate the administration of accounts through the use of corporate directory data. |
|
Security Assertion Markup Language (SAML) |
Ideal for companies preferring single sign-on (SSO) authentication so that users can log in directly using their business credentials. This authentication protocol is recommended for its simplicity and high level of security. |
|
Kerberos |
A good security measure for companies seeking to manage authentication via a symmetric encryption protocol. |
|
Open ID Connect |
Ideal for companies seeking to delegate authentication of their employees to a trusted identity provider. |
Please note
You can either require authentication via an external authentication protocol or you can allow for its use alongside oodrive credentials.
Lightweight Directory Access Protocol (LDAP)
The LDAP protocol is a way to perform account provisioning. When activated, the Oodrive platform queries your company directory to check the user name and password entered by the user. If correct, the user logs in, otherwise the login attempt is denied.
Before you proceed with this configuration, we invite you to contact the Oodrive Support Team in order to set up the necessary network firewall rules and allow communication between your LDAP directory and our services.
-
In the Access Management module, click on the Authentication section.
-
Click on the drop-down menu, then select LDAP.
-
If you would like to apply this authentication mode to all workspace users, without exception, check Require this authentication type.
Note
Do not check this option if you plan to enable passwordless authentication on your workspace.
-
Click Apply, then click New configuration.
-
Indicate a Configuration name and the User type (user or contact) for which you would like to configure the LDAP protocol.
-
Complete the fields in the Connection section, then click Test to verify whether the connection can be established.
In case of an error, check that:
-
You have already provided the information in the Host field (your IP adress or domain name) to the Oodrive Support Team
-
Oodrive's public IP is allowed to access your LDAP directory
-
-
Complete the fields in the Configuration section to indicate which users from your LDAP directory should be provisioned in your Oodrive workspace.
-
Complete the fields in the Attributes section to set up the automatic provisioning of accounts based on information from your LDAP directory. All fields with a red asterisk are required.
Careful
The following fields must not be confused. Please use the information provided below to fill them in properly.
-
Username : username displayed on the user sheet in your Oodrive workspace
-
LDAP login : information allowing users to authenticate to LDAP from the login page of your workspace (E.g. email address, phone number, username...)
-
LDAP ID : unique key used to identify a user account in the LDAP directory. This value should not be changed because it links a user's Oodrive account to their LDAP account
-
-
Click the button Configuration test to test the LDAP connection and verify that it works properly.
-
Click Create to save your configuration.
-
Once the configuration is complete, click Synchronize to proceed with the provisioning of accounts from your LDAP directory.
You can find the accounts provisioned via LDAP in the Users administration module.
Return to the Authentication section to modify this authentication protocol at any time.
Security Assertion Markup Language (SAML)
SSO (Single Sign-On or SSO) via SAML allows a user to access multiple applications using their company login credentials.
If the user is already authenticated in the IDP (Identity Provider) when making the login request, they will directly access the solution without needing to re-enter their login credentials.
If, on the other hand, the user is not yet authenticated, they will be redirected to their IDP so they can quickly authenticate and log in to their workspace.
The following procedure will help you configure SAML SSO for the Active Directory Federation Services (AD FS) IDP connected to an LDAP user directory.
Step 1: Define the authentication type
-
In the Access Management module, click on the Authentication section.
-
Click on the drop-down menu, then select SAML.
-
If you would like to apply this authentication mode to all workspace users, without exception, check Require this authentication type.
Note
Do not check this option if you plan to enable passwordless authentication on your workspace.
-
Click Apply to confirm your choice.
Step 2: Exchange metadata files
In order to establish a relationship of trust between the two entities, and make communication possible, the Oodrive platform and your IDP need to have access to each other’s metadata files.
Transfer your metadata file to Oodrive
-
In the Authentication section, click Browse to search and select your metadata file in XML format, from your computer’s file explorer.
Note
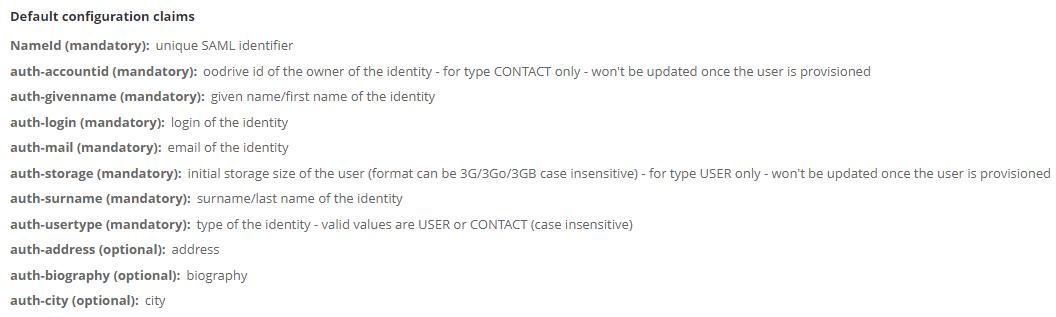
In order to ensure the proper configuration of the configuration claims, please see the definitions found along the bottom of the page before selecting the metadata file.
-
Enter a file name for the network storage server, then click Import.
Download Oodrive’s metadata file
-
In the Oodrive SAML server configuration section, click Download Oodrive metadata file.
-
Use your computer’s file manager to save the file spring_saml_metadata.xml.
This metadata file will allow you to register Oodrive as a trusted party with your IDP.
Step 3: Configure the relying party trust on your AD FS server
-
On the AD FS server, open AD FS Management.
-
Expand the Trust Relationships folder.
-
Right-click the Relying Party Trust folder and select Add Relying Party Trust.
You are accessing the configuration wizard of a relying party trust.
-
Click Start to begin the configuration process.
-
At the Select Data Source step, select Import data about the relying party from a file.
-
Use your file manager to select the file spring_saml_metadata.xml, which you downloaded in the Access Management module.
-
Click Next.
-
At the Specify display name step, enter Oodrive as the relying party trust’s display name.
-
Click Next until you reach the last step, then click Close.
Step 4: Configure the claim rules
Once you finish configuring the relying party trust, you automatically access the claim rules edition window.
Note
If the claim rules edition window does not open automatically, right click the relying party trust you just created and click Edit Claim Rules.
Configuring the claim rules will enable communication between the Oodrive platform and your IDP.
Establish correspondence between variables
This step consists in linking the variables of each entity to their counterpart in order to ensure the viability of data exchange.
-
Click Add Rule.
-
In the Claim rule template drop-down menu, select Send LDAP Attributes as Claims, then click Next.
-
In the Claim rule name field, enter AD-Rules.
-
In the Attribute Store drop-down menu, select Active Directory.
-
In the Mapping of LDAP attributes to outgoing claim types table, make the following associations:
LDAP Attribute
Outgoing Claim Type
SAM-Account-Name
Name ID
E-Mail-Addresses
auth-login
Company
auth-company
E-Mail-Addresses
auth-mail
Given-Name
auth-givenname
Surname
auth-surname
Note
To make optional associations, please refer to definitions found in the Authentication section of the Access Management module, under Default configuration claims.
-
Click Finish.
Set up the default user type
When your colleagues log in to the workspace for the first time with their LDAP credentials, an account is automatically created for them. This step shows you how to set up platform User or Contact accounts for them.
-
Click Add Rule.
-
In the Claim rule template drop-down menu, select Send Claims Using Custom Rule, then click Next.
-
In the Claim rule name field, enter auth-usertype.
-
In the Custom rule field, enter one of the following rules:
To create User accounts: => issue(Type = "auth-usertype", Value = "USER")
To create Contact accounts: => issue(Type = "auth-usertype", Value = "CONTACT")
-
Click Finish.
Set up the default storage
The storage space allocated to a User can never be void. This step consists in setting up the default storage allocated to colleagues when their account is created.
-
Click Add Rule.
-
In the Claim rule template drop-down menu, select Send Claims Using Custom Rule, then click Next.
-
In the Claim rule name field, enter auth-storage.
-
In the Custom rule field, enter the following rule: => issue(Type = "auth-storage", Value = "5G") ;
Please note
This rule sets up a default storage value of 5 GB. Your provisioning manager can later change this value in the User management module.
-
Click Finish.
Once you finish configuring the three claim rules, click OK.
You have finished configuring the SAML SSO. Your users can now access their workspace with their company login credentials.
Disable automatic account provisioning
If you want to keep control over the provisioning of your workspace user, and manage the creation of user accounts manually, you can disable automatic account provisioning.
-
In the Access management module, click on the Authentication section.
-
Click on the drop-down menu and select SAML.
-
Go to the List of metadata files on the NAS section and click on the pencil icon to the right of your metadata file.
-
In the Edit field mapping window, go to the Auto Creation section and select No.
-
Click Save.
Return to this section at any time to re-enable automatic account provisioning.
Kerberos (Active Directory)
SSO (Single Sign-On or SSO) via Kerberos allows for managing authentication using a symmetric encryption protocol. Kerberos provides session specific authentication tickets. This means that each user must be associated with a single service in order for this type of authentication protocol to be configured.
-
In the Access Management module, click on the Authentication section.
-
Click on the drop-down menu, then select Kerberos.
-
If you would like to apply this authentication mode to all workspace users, without exception, check Require this authentication type.
Note
Do not check this option if you plan to enable passwordless authentication on your workspace.
-
Click Apply, then click Browse to search and select your keytab file in XML format, from the file explorer.
-
Repeat until you have imported all the keytab files on the network storage server.
-
Enter the name of the main service, then click Import.
Return to the Authentication section to modify this option at any time.
OpenID Connect
Authentication via OpenID Connect allows the Oodrive platform to verify a user's identity using the authentication provided by an external authorization server such as Github, Google, Okta, or any other compatible service.
In order to secure and control access to your workspace, only the identity providers that you have previously registered in the Access Management module can be used to access your workspace via OpenID Connect.
Please note
Configuring an external service only enables the authentication of employees and does not in any case enable access to the data stored on your workspace.
To log in to your workspace using OpenID Connect, users must follow the steps below.
Step 1: Access the workspace login page
The user goes to the workspace login page, then clicks Next located under “Please login using your company credentials”.
Step 2: Select a service
The user selects the service they want to use to log in, among those you have configured.
Careful
It is not recommended to select one of the pre-configured services (Google, Github, Okta) when configuring OpenID Connect, as all users who have an account with this service will be able to access your workspace, without any particular restrictions in place.
Step 3: Log in to the service
The user is redirected to the standard login process of the selected service.
Once logged in, the Oodrive platform automatically retrieves the last name, first name and email address of the user and creates a new account for them on your workspace.
Step 4: Access the workspace
The user accesses your workspace with the account that was just created for them.
Configuring OpenID Connect
-
In the Access Management module, click on the Authentication section.
-
Click on the drop-down menu and select OpenID Connect.
-
If you would like to apply this authentication mode to all workspace users, without exception, check Require this authentication type.
Note
Do not check this option if you plan to enable passwordless authentication on your workspace.
-
Click Apply, then New configuration to configure a new identity provider.
-
Enter the Configuration name, then select Other in the Identity provider drop-down list.
Careful
It is not recommended to select one of the pre-configured services (Google, Github, Okta) when configuring OpenID Connect. We advise that you configure these services yourself by selecting Other, so that only your employees may access your workspace.
-
Complete the fields in the Connection section. All fields in the form are required.
-
When you have finished, click Create.
-
Click on the identity provider you have just configured and copy the link in the Link to be sent to OpenID authentication provider section.
You need to share this link with your identity provider in order to complete the configuration of OpenID Connect.
Return to the Authentication section to modify this option at any time.
Ressources