 Help Center
 Go to Oodrive
Customizing your license
As a holder of an Oodrive Sign account with administrative rights, you can customize your license to suit the requirements of your company.
This lets you:
Customize the appearance of your signature platform,
Customize your users' dashboards,
Manage advanced settings for your license.
Set the license theme
From your license settings, you have full control over the customization of your signature platform using your company's corporate branding colors, and you can make changes to these custom graphics as required.
A preview of your changes will be visible in real time so that you can improve the display throughout the customization process.
-
Click your profile in the upper-right corner of the screen.
-
In the side menu, click Settings.
-
Customize the theme as desired in the Your theme tab:
To modify the logo for your license:
-
Click the current logo in the Your logo section.
-
Select the new logo in your file explorer.
Note
For the best final rendering, we recommend the use of a 140 x 45px image.
To modify the colors for your license:
-
Click the colored square to the left of Main color or Secondary color.
-
Select the color of your choice using the color selector or by entering a hexadecimal code in the field provided for this purpose.
-
If you have chosen light colors, you can adjust text color by enabling the Shade for related text: Dark setting.
-
-
View your changes in real time in the rendering sample to the right of the screen.
-
Once you have finished, click Ok.
The new graphic theme will be immediately available for users of your license.
If you wish to cancel your changes and return to the default theme, click Reset.
Customize the dashboard
The My contractsmenu is the dashboard where users can track transactions started within their permissions group:
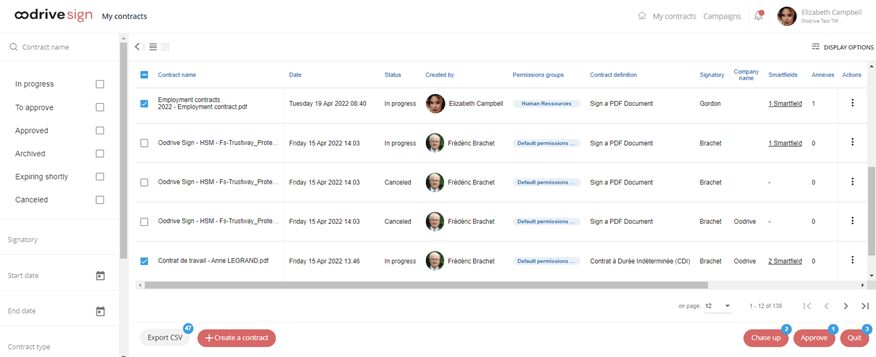
From your license settings, you can customize how the dashboard columns are displayed, in order to show the information that is most relevant to your activity.
These customized settings will be the default for all users of the license, but users will be able to change the display options to suit their own personal requirements.
Create columns
Default columns are preconfigured for your license (Date, status, permissions groups, annexes, etc.), but you can also add customized columns to your dashboard.
-
Click your profile in the upper-right corner of the screen.
-
In the side menu, click Settings and select the Dashboard tab.
-
Click Create column.
-
Enter the name of the column, then select the type of content it will display from the available options:
Text
Flag (colored dot)
Date
-
If you want to use the contract data to fill in the column, enable the Dynamic content setting.
Whether you activate this option or not, users can manually enter information in each customized column from their dashboard.
-
If you want to allow sorting of the column by ascending or descending order, enable the Custom sorting setting.
-
Once you have finished, click Approve.
Once the column has been created, it appears in the list of available columns. You can create as many columns as you wish
Modify or delete columns
You can modify or delete the custom columns you have created for the dashboard at any time.
Please note: You cannot edit or delete the preconfigured columns. However, you can choose to hide them.
-
From the Settings menu, go to the Dashboard tab.
-
Identify the column you wish to edit or delete, and click the three dots to the right of the column to display the available actions.
-
To modify a column, click Edit and make your desired changes. Once you have finished, click Approve.
-
To delete a column, click Delete, then confirm your choice.
-
-
If you wish to change whether a column is displayed or not, select or deselect the Displayed setting.
Organize columns
You can organize the dashboard columns to highlight the most relevant information for your activity.
-
Click your profile in the upper-right corner of the screen.
-
In the side menu, click Settings and select the Dashboard tab.
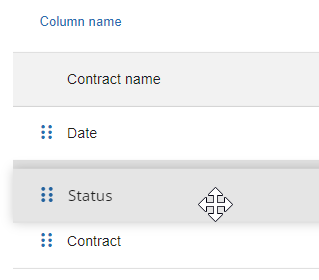
You can see the list of available columns for the dashboard display:

-
Show or hide the columns of your choice by ticking/unticking the box in the Displayed column.
-
Drag and drop the table lines to arrange the columns in the order of appearance of your choice.
Your changes are auto-saved as you make them, and will be available immediately in the users dashboard for your license.
Manage advanced settings
As a user with administrative rights, the Configuration menu allows you to manage advanced settings for your license to suit the requirement of your company. You will also be able to enable or disable certain features.
-
Click your profile in the upper-right corner of the screen.
-
In the side menu, click Settings, then go to the Configuration tab.
-
Go to the section of your choice to manage the corresponding settings:
-
Company information
-
Your company's address, town/city, country and ZIP code.
-
Domains used for employee e-mail addresses (this information enables Oodrive Sign to identify internal signatories)
-
-
Create new contracts page
-
Show new default thumbnail type icons
-
Welcome screen after sending for signature
-
Show or hide the bundles section on your home page
-
Define the display order of the bundle and campaign creation sections
-
-
Contract creation
-
Make transaction autovalidation availble to non-managers
-
Enable sequential signature
-
Allow signatories not to sign all documents in the bundle
-
Enable the “Place Custom Smartfields®” feature
-
Enable the “Smartfields® Detection” feature
-
Enable the "Detect/add Smartfields" feature
-
-
Managing document templates
-
Allow users to put legal notices in document models
-
Allow users to select signature modes in document models
-
-
Sending e-mails
-
Define name of sender
-
Define sender format in email notifications
-
Define when to send an email to people in carbon copy
-
Define the default e-mail template ("Modern" is recommended)
-
-
Signatories directory
-
Open signatory directory if no signatory is already present on the document
-
Limit directories to user perimeters
-
Enable management of signatory groups
-
Limit directories to user roles
-
-
Signature page
-
Automatically send the OTP via email if the phone number is incorrect
-
Forces OTP usage via phone
-
Forces OTP usage via email
-
Display draft before collection
-
Makes the phone number for OTP unmodifiable
-
Allow signatories to download annexes
-
Display the list of signers at the time of signing
-
Signature pad type
-
Display the validator’s name in the countersignature block
-
Allow signers to sign multiple documents with a single consent
-
-
myOodrive Sign
-
Allow signature from the mobile app
-
Offer the use of the mobile app to signatories
-
-
"My documents" page
-
Display the "My Documents" page in condensed view
-
Add filter for contracts to sign (experimental)
-
-
"Document Details" page
-
Allow signatory transfers
-
-
More
Manage links and redirection (to documentation, the "about" page, brochures...).
-
-
Once you have finished, click OK to save your changes.
Ressources